Saturday, December 20, 2008

Those Devilish Eggs!

Just a quick tip.......don't you just hate peeling the shells from boiled eggs??? I think it would be the number one reason I would never sign up for deviled eggs at office luncheons (there are other reasons though...).


Rachel Ray showed a quick and easy way to get those shells off in a snap. You boil your eggs, then pour out the water, put the lid on and shake them......shake them well, making sure the eggs bounce all over the pan. When you take off the lid, the shells are cracked into tons of tiny pieces that slide right off! Hmm....maybe we'll have deviled eggs this Christmas!

Tuesday, December 16, 2008

Thanksgiving Update

I can't believe I never posted anything about our Thanksgiving dinner. I had the most fabulous time helping Shelby (via tons of telephone calls!) cook her first Thanksgiving dinner, which was a total success!
Mine was smaller than usual this year, but I did make some changes that I thought I'd tell you about, especially since these dishes do tend to grace Christmas dinner tables!
The first was my mashed potatoes....we've all had successes and failures with this dish! I've made them too thin, too lumpy....you name it! But this year I bought a gadget (and one for Shelby, too!) that makes no-fail mashed spuds.....a potato ricer! Believe it or not, I got it at Farm Fresh....and it works! Just boil your potatoes, as usual....just make sure they don't get too mushy...just fork tender. Then spoon them into the ricer and push them out! It sure beats having to clean spuds off the cabinets when you use a mixer...and the food processor turns them into something even a baby can't eat...wayyyy too thin! They were perfect, especially after I added a whole head of roasted garlic, butter and sour cream. Yummmmmm!!!
The next thing I did was change up my green bean casserole recipe. I literally cannot stand canned cream of mushroom soup, which is why I never made green bean casserole until a couple of years ago, by request only. To "mask" the canned soup taste, I added sour cream, mayonnaise and cheddar cheese and everyone LOVED it....but it still bothered me that I was using something in my food that looked like glue...and didn't taste much better! Sooooo......I melted a little butter in a pan on medium high and sauteed some chopped up mushrooms, added a little flour, salt and pepper and cooked the floury taste out of it, then added half and half until it was thick!!! Homemade Cream Of Mushroom Soup!!! This year's casserole was, by far, the best I've ever had....no more canned mushroom soup for me!
The next thing I did was change up my pumpkin pie a little......I had read somewhere that they had used a portion of sweet potatoes to pumpkin puree and it made it better, so I tried it. I used 1/3 canned sweet potatoes and 2/3 pumpkin puree....ohmigosh!!! It was the silkiest pumpkin pie I've ever had and it had a richer color, too!
So, even though I didn't make everything I normally make when Shelby is home, I made the "must haves" and our dinner was wonderful!!! I hope you have a change to try some of these changes in your dishes.....they work...promise!
Oh yea....the turkey turned out great, too!

Thursday, December 11, 2008

It's a New Soup Day!!!

The best thing to do on a rainy day is make a pot of soup! I made this one a couple of weeks ago....it was all gone in two days! I got this recipe from Tyler's Ultimate, one of my most favorite Food Network shows. It's rich and delicious!


The Ultimate Beef Stew

Ingredients

1/4 cup extra-virgin olive oil, for frying, plus more to drizzle
3 tablespoons butter
2 cups all-purpose flour
2 to 3 pounds beef chuck shoulder roast, cut into 2-inch pieces (this cut is also called chuck shoulder pot roast and chuck roast boneless)
Sea salt and freshly ground black pepper
1 bottle good quality dry red wine (Tyler recommends burgundy....I used my favorite Black Dog from Chateau Morrisette...down the street from Melin's cabin!)
8 fresh thyme sprigs
6 garlic cloves, smashed
1 orange, zest removed in 3 (1-inch) strips (I left this out....orange and beef?)
1/4 teaspoon ground cloves (I left this out...just not crazy about cloves!)2 bay leaves
2 1/2 cups beef stock (I used Kitchen Basics)
9 small new potatoes, scrubbed clean and cut in 1/2
1/2 pound carrots, peeled and sliced
2 cups frozen pearl onions, a large handful
1 pound white mushrooms, cut in 1/2
1/2 pound garden peas frozen or fresh
Fresh flat-leaf parsley, chopped, for garnish

Horseradish Sour Cream, recipe follows, for garnish

Directions

Preheat a large heavy-bottomed saucepan or Dutch oven over medium-high heat with the oil and butter.

While the pan is heating, arrange the flour on a large dish. Season the cubed beef with some salt and freshly ground black pepper and then toss in the flour to coat. Shake off the excess flour and add the beef chunks in a single layer to the hot pan, being careful not to over crowd the pan, you might have to work in batches. Thoroughly brown all of the cubes on all sides. Once all the meat has been browned remove it to a plate and reserve.

Add the wine to the pan and bring up to a simmer while you scrape the bottom of the pan with a wooden spoon being sure to loosen up all those tasty bits. Once the wine has gotten hot add the browned meat, thyme, smashed garlic, orange zest strip, ground cloves, freshly ground black pepper and salt, to taste, bay leaves and beef stock. Bring the mixture up to a boil and then reduce the heat to a simmer and cook uncovered until the liquids start to thicken, about 15 to 20 minutes. Cover and cook on low heat for 2 1/2 hours.

After 2 hours add halved potatoes, sliced carrots, pearl onions and mushrooms, along with a pinch of sugar to balance out the acid from the red wine. Turn the heat up slightly and simmer, uncovered, for 30 minutes more, until the vegetables and meat are tender. Add the frozen peas during the last minute of cooking. Season with salt and pepper and remove the thyme sprigs.

To serve, place the stew in a soup bowl, garnish with parsley, drizzle with olive oil and add a dollop of Horseradish Sour Cream. Right before serving add a slice of toasted french bread, rubbed with garlic and drizzled with olive oil, half way submerged in the stew.
Horseradish Sour Cream:

1 cup sour cream
1 tablespoon prepared horseradish
Olive oil
Salt and pepper
Chives, finely chopped, as garnish
Combine sour cream, prepared horseradish and a drizzle of olive oil in a small bowl and mix until thoroughly combined. Season with salt and pepper. Add a dollop of the mixture on top of the stew and garnish with chopped chives.
Enjoy! Have a great day everyone.....and to all on the East Coast, stay dry!!!

Wednesday, December 3, 2008

A Facelift for the Holidays!!!

I've been waiting for Thanksgiving to be over so I could use the Christmas blogskin that matches my kitchen during the holidays! Over the years I have collected just a few decoratives that are peppermint....not really intentionally, it just happened. I'm actually not a fan of the mint flavor, but I love the look of peppermint. I use clear glass candy jars and fill each with a different size or shape of peppermints, including one that holds candy canes. I also have a peppermint apron, peppermint spreaders.....so, now my blog matches my kitchen! I wish they had this one without the "ho ho ho"....I'd keep it year round!

Wednesday, November 26, 2008

How Sweet It IS!!!!

I know I haven't been here for you, but it's not too late! Thanksgiving is tomorrow! Sooooo....just in time.....my recipe for Sweet Potato Souffle! We have to have this on our table, but it's so rich that we never eat all of it! Maybe we would if I didn't also make the pumpkin pie.........hmm....should I? No, no, no.....gotta have that, too!

Sweet Potato Souffle
3 cups mashed sweet potatoes (canned or fresh)
1 cup brown sugar (try less, then add more to taste)
2 eggs
1 teaspoon vanilla
1/2 cup milk (or half and half or evaporated milk)
1/2 cup melted butter
Topping
1/2 cup brown sugar
1/3 cup flour
1/3 cup melted butter
1 cup pecans (chopped)
Combine first 6 ingredients. Pour into a buttered 1½ to 2-quart casserole dish. Mix remaining ingredients together and sprinkle over top. Bake at 350° for 30 to 40 minutes, until hot and lightly browned.
I'm making mine tonight, so I'll add the pictures later. This is one of those sides that is very easy to make the day before and keep in the fridge until time to bake.
Happy Thanksgiving Eve!!!

Tuesday, November 18, 2008

Here it is............

I guess blogging that she was a "slacker" at getting the Cabin Chicken Chili recipe to me worked! I received an email from her this morning at 9:09 AM....I'm guessing she read the blog at 9:05 AM~ Here's her email:


Ok Here it is…… Ta…da……

Melinda’s Cabin Chicken Chili:
I promise you will fight over the last spoon full… it’s that good J

2-3 lbs of skinless boneless chicken thighs (cut up in to 1 inch pieces with a scissor)
3 tablespoons of chili powder
4 tablespoons of cumin
One large bottle of mild salsa (or 2-3 med size bottles)
2 (small 8-10 ozs) cans of chicken stock
2 cans red kidney beans (drained but not rinsed)
2 cans Negro black beans (drained but not rinsed)
1 large stock pot (the kind you boil pasta in)

Once you have cut up the chicken thighs sauté the meat in 3 tablespoons of vegetable oil on medium heat
Add the chili powder and cumin while sautéing the chicken thigh meat and stir frequently so the chicken does not stick to the bottom of the pot.

Once the chicken is partially cooked add in your remaining ingredients, bring to a boil and let cook for an additional hour on medium –low heat, and then serve with corn bread (see recipe below)

If you like the taste of cilantro and lime, cut up fresh cilantro and sprinkle on top of the chicken chili in individual bowls and then squeeze 1/8th of a lime into the chili in individual bowls (yum-yum)
You can add some hot sauce too, it doesn’t need to be added when cooking (the taste doesn’t change)
Makes enough for 6-8 people

To serve a bunch (like up at the cabin) just double triple or quadruple the ingredients- it last in the frig for up to a week and can be frozen for up to 6 months (don’t be surprised if it thickens, I personally like it best the second day when it has thickened more!

Brad’s Smack Your Lips Corn Bread

One box corn bread mix- follow the directions on the side of the box
In place of the liquid in the directions, substitute a can of creamed corn, bake as directed ( in a 9inch pan or individual cup cake papers and a muffin pan) Serve hot, some like breaking up the corn bread into the chicken chili, I love it with a little butter melting on top… to each his own…

Bon Appétit mes Amie!! Love to all Melin

Monday, November 17, 2008

Calling All Hungry Bloggers.......

She may not blog, but I know that she loves reading them.....so, here's the deal....I know she's busier than a one armed wallpaper hanger, but it's cold outside and I want chili!!! I've asked nicely for the recipe....and because I love her, I don't want to get ugly. So, I figure if we all post a request for the Graves Cabin Chicken Chili recipe so I can post it on this blog, she just might comply. Whaddya think? Worth a try? Don't worry, if my plan fails, I will get ugly!!!

Sunday, November 9, 2008

1 + 1 = 1 Awesome Dinner

I had a pork loin in the fridge and I had a nice sized butternut squash. So, I decided to make the Herb Crusted Pork Loin that I made a couple of weeks ago and make the butternut squash "Shelby Style" (cut into fry shape). I wasn't feeling very well, so I decided to just put the squash around the pork and cook them together.....OHMIGOSH!!!!! The juices from the pork, flavored with garlic and herbs, was fantabulous!!!!!!! I took a picture of it before I baked it...

....but there isn't an "after" photo! The smell of them cooking together was overwhelming....I even opened the oven door with a fork in my hand a couple of times.....as soon as it came out of the oven, it was on the plate. Wow.....it was delicious! So, the next time you make the butternut squash, try adding some crushed garlic and/or thyme, and/or rosemary....then toss and bake. It's yummmm!

Friday, November 7, 2008

Turkey Time! Thanksgiving, Part I

If I had to guess, I'd say that I've cooked approximately 35 turkeys, between Thanksgiving and other holidays. Before I cooked each one I scoured cookbooks, watched cooking shows and searched the internet far and wide for new ways of making this Thanksgiving staple better than before.


At first I just did what my Mom did....stuffed it with my stuffing, buttered, salted and peppered the top and threw it in the oven until the plastic thing popped up. I threw out the plastic thing quite some time ago, but the other things I still do. But I've added a few new tricks to my repertoire!!


I have also deep fried my turkey, but it was always as a back up. I can't stand the thought of not having that baking turkey smell in my kitchen on Thanksgiving Day, nor would I ever be able to live without those intensely flavored drippings in the bottom of the pan for my gravy!


I've even smoked turkeys.....in fact, add about 40 more turkeys to that count above! There was a time that about two weeks before Christmas we spent EVERY evening smoking a turkey, wrapping in in cellophane, topping it with red plaid ribbon and holly and delivering it to a wonderful friend! They were delicious, but again, no turkey aroma or drippings!


For the last two years, Dennis and I have brined our turkeys! For those who wish to brine, here's my recipe:

2 cups Kosher salt
1/2 cup brown sugar
1 gallon vegetable stock
2 tablespoons dried sage
1 tablespoon peppercorns
1 gallon ice water

On Thanksgiving Eve bring vegetable stock to a low boil, then add the brown sugar, stock, sage and peppercorns. Let simmer just until everything has dissolved and melded together (about 3 to 5 minutes). Pour in the ice water to cool it down. Place your turkey in a plastic bag and pour in the brine...close tightly and place in a cooler. Since refrigerator space is at a premium at Thanksgiving, we put the cooler on the deck and keep the bag covered in ice. I turn it every once in a while to make sure every inch is getting brined. When you're ready to bake your turkey, remove it from the bag, dry it off and get ready to bake!


Now........this year I've heard about a new way of cooking a turkey. The premises is that the water in the brining tends to make the meat a little rubbery, albeit very juicy. This technique is called "salting". According to Bon Appetit, "the salt draws moisture from the interior of the bird to the surface, where it combines with the salt and other seasonings. Eventually, that flavorful salted liquid is reabsorbed by the meat, seasoning it throughout". Of course, I did some other researching on the internet and those who have tried it say it has the flavor of brining, but has a better texture. Just for you, we tried it!
1/2 cup plus 1 T coarse kosher salt
1 1/2 t dried rosemary
1 1/2 t dried sage
1 1/2 t dried thyme
1 t crushed black peppercorns
3 small bay leaves, coarsely torn

Rub these ingredients in a small bowl to crush the herbs finely. Rinse turkey inside and out. Sprinkle the inside and under the top skin of the turkey with this mixture, cover and refrigerate for 18 to 24 hours.

Isn't that much simpler than dealing with the brine....we were curious if it would make a difference in the texture and couldn't wait until the next day to bake our turkey!

The next day I took the turkey from the fridge about 2 hours before baking and rinsed it off inside and out....I let it rest, covered with a cloth, to come to room temperature. I preheated my oven to 325 degrees, then I stuffed the cavities (back and front) with cut up onions, celery and fresh sage (normally I stuff it with stuffing...that's why they call it stuffing!).The next step is to close up the bird....I use the small metal skewer that you normally use to lace up the bottom of the turkey and I use twine to tie the legs together...I end with a bow so it's easy to undo after the turkey is cooked. Then I rubbed the entire turkey with room temperature butter, covered the bird with 4 layers of cheesecloth and saturated it with the juices from the "innards" of the turkey that I had cooked in boiling water with carrots, celery and onions. Put it in the oven and bake it, basting every 45 minutes (make sure the bird and the pan don't get too dry!) We use a remote cooking thermometer.....we stick the end into the thickest part of the thigh, as shown here:

I bake my turkey at 325 degrees until the thermometer registers 170 degrees. Once you take it out of the oven, baste the turkey again so that taking off the cheesecloth won't tear the skin. The cheesecloth is a "MUST".....it helps to keep the turkey moist and it makes for an evenly browned skin.Voila....a beautifully browned turkey.....and the meat was juicy and tender...not dry and rubbery. I think I may have found a winner....not that it will keep me from my annual turkey cooking research! I'm always looking for a new way to make my food better! Before I go, let me add a tip..........make sure your turkey has no additives or preservatives....that will completely ruin your bird! You just want a nice, fresh turkey.....or nice, freshly frozen bird!

Let me know how yours turns out!

Thursday, October 30, 2008

Thanksgiving Pre-Show!!!

Shelby called last night, and as usual the discussion turned to Thanksgiving. It's really her favorite holiday of the year! She said that her goal this year is to learn to make bread.....then she remembered the bread I used to make and asked me about it.

I got that recipe sooooo long ago that it's in shreds right now....touch it and it turns to dust. But it's a great recipe and although I've seen it duplicated in many ways, I still make it the same. You start by making your "starter". Before commercial yeasts and baking powders were available, this is similar to how bread was made.


Bread Starter

3/4 cup sugar
1 cup very warm water
3 tablespoons potato flakes (See Note)


Stir together using a wooden spoon (never put a metal spoon in your starter)... ...and set out on the counter for 3 to 5 days. Stir it every day until you see bubbles forming at the top of the mixture. Then place it in the refrigerator for 3 days.
After 3 days, remove the mixture from the fridge and add the above ingredients again and stir. Leave on the counter 8 to 10 hours. Remove one cup of the mixture and throw it away, then put back in the refrigerator for an additional 3 to 5 days.

The next time you take it out, feed it....leave on the counter 8 to 10 hours, then use one cup of the mixture to make your bread or give it to a friend, putting the rest in the fridge for future use.
I know this sounds daunting, but I promise you it's not. I'll keep you posted on the progression of my starter, then we'll make bread together!
Important Note: Make sure when you purchase your potato flakes that you don't buy any that are flavored...not even with butter. You need the plain potato flakes,ok?

Ohmigosh....these are soooo good!

This isn't my recipe, it's Shelby's....she said she was going to post it, but never has. I made them last night and just have to share!

Shelby called me one night and said, "Mom, I just made these butternut squash fries and they never made it to my plate....I hovered over the pan and ate them all!" I decided to try them myself and they were awesome. Last night I decided to make them again, only this time I would cut them into cubes instead of the fries. They were still delicious, but I think I'll stick with the fry shape....they are thinner and crisp up better....and this recipe is very simple and very quick to make...more yummy than work!
First I use a potato peeler to peel my squash.........then I cut it right where it starts to "bulb out"........I scoop out the insides (like making a jack o lantern!).........then I cut them into cubes.....put them in a pan and drizzled olive oil over them, then added salt and pepper.....
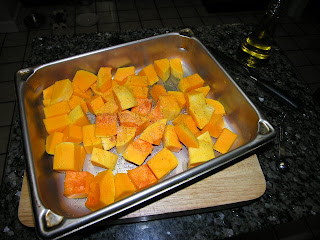
.....then I baked them in the oven at 400 degrees for about 40 minutes.
I love butternut squash and acorn squash.......they taste quite similar. I think that the next time I will try these with a little cinnamon and nutmeg....yummmm!

Monday, October 27, 2008

Coming Soon.............

I'd like to announce my Thanksgiving 2008 series.......since Shelby will be fixing her very first Thanksgiving dinner without me, I figured that doing this might save a little time on the phone on Thanksgiving Eve and Thanksgiving Day. She is well prepared.....she just doesn't know that. She has been by my side for many, many Thanksgiving dinners.....at first she just watched and stuck her fingers in things....later she wanted to pour and stir.....then she wanted to chop (that was scary).....and then she wanted to do different dishes by herself.


I'm excited about her cooking her first one by herself...but I'm sure it won't hit me until she's not here at my stove just how hard it will be to cook my own. I will miss her, no doubt, and even though Evan has actually volunteered to wear her apron this year there will be a hole in this Thanksgiving. But I truly am excited for her to cook her first one by herself.....I can't wait for her to realize what a great cook she is. She is soooo much better than I was at her age!


I love you, Shelby.............and I miss you..........and I'm so excited for you and the life you are living.


Love,

Mom

XOXOXO


PS - The first in the Thanksgiving series will be the cooking of the turkey. I have cooked them the way my Mom did....I've brined, deep fried and smoked.....and this year I think I've made a new discovery..............................check back for Tim Turkey, 2008! (The turkey for the series is courtesy of Shelby.........her last paycheck from Harbor's Edge)

Sunday, October 26, 2008

Soup's On.........Again!

It's a Sunday thing....and it's nice to have leftover soup during the week. This Sunday it was Dennis' choice. As usual, he couldn't think of anything, so I gave him three choices: Broccoli and Cheese, Chili and French Onion.....he chose the latter and I was glad....I love French Onion Soup!


This time I decided to add a little twist and it turned out awesome! I started by chopping up my onions. I prefer this method versus the rounds....easier to cut!


I made a small batch, so I used two onions and a half stick of butter. I melted the butter and added the onions, a sprig of thyme, a bay leaf, 1 chopped garlic clove, salt and pepper. I let them cook on medium low for about 25 minutes until they were nice and carmelized. While the onions were cooking, I put the bread in the oven. I love the "Take and Bake" french bread at Food Lion....it's delicious!I also shredded my cheese. I usually use slices of provolone....I love how it melts down the side of the bowl when you broil it. But this time I used Gruyere....it's nutty and delicious, but you have to shred it. Then I added about a half cup of red wine and let that completely reduce. Next I added about a tablespoon of flour and stirred it in well......you have to make sure that red wine is gone and all that's left are the onions and the butter or you'll have lumps! Once that's done, I added a quart of beef stock and two cans of beef broth (but you can use all broth or all stock....it was just what I had on hand).


Bring the soup back up to temperature and it's done! Next ladel the soup into bowls and float slices of the french bread on top.......cover with a nice layer of the shredded cheese, place on a baking sheet and broil for about 3 to 5 minutes....make sure you keep an eye on them!! The only thing left to do is eat!!!

It was delicious! I'll make it this way from now on!

Saturday, October 25, 2008

Guess Who's Coming To Dinner.........

They'd been trying to get up with us for a couple of days to give us some pills they'd ordered off the internet for Shugs.....she scratches NON-STOP and they said they had the cure. We'd been so busy we hadn't had a chance to connect, so I decide we'd invite them for dinner that night...last night.....who, you ask??? Shugs' Uncle Brad and Aunt Minda!!!!


Melinda got off earlier than Brad, so she came on over to help me prepare dinner......Herb Crusted Pork Loin with Roasted Vegetables and Yeast Rolls!!!!!!!! We had a blast getting things ready and taking pictures to post here! So here's how it went!


Herb Crusted Pork Loin (I will post the actual recipe at the end of this post.....we didn't use it, so we'll walk you through what we did!):


We got our aromatics together for the crust: rosemary, thyme, parsley, green onions (regular onions, shallots or leeks work just as well!!!), LOTS of garlic, fresh bread, salt, pepper and olive oil. I used my mini food processor, so I put the herbs in first and processed them until they couldn't process any more......then I poured them in the bowl and processed the bread (I used about 5 slices for this loin) and added it to the herb mixture. Melinda then stirred that while pouring olive oil into the mixture to form the "stuffing-like" crust. 
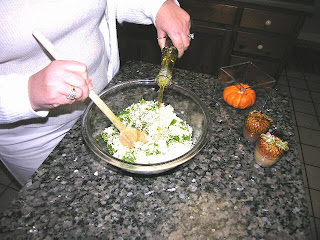
Next we sliced open the loin and spread the herb crust mixture inside....closed that up.....salted and peppered the top of the loin, then added the remaining herb crust mixture. Tah Dah!!!!! That's it!!! I baked it at 375 degrees until my meat thermometer registered 165 degrees, which was about an hour.


For the roasted vegetables, I sliced longwise zucchini and yellow squash into slices about 1/4 inch and put them in a large zip top bag. Then I sliced a tomato into four slices and added that....I also added green onions (Cut about two inches above the white part), red bell pepper and shitake mushrooms. Then I covered them with my marinade, which is simply Good Seasonings Garlic and Herb Dressing made with olive oil and balsamic vinegar instead of the veggie oil and vinegar (I love it!!!). I made sure everything was well coated and let it sit until Dennis cooked them on the grill.........ooops!!!! We forgot to take pictures of him cooking the veggies!!!!!!!!!!!


After the pork loin came out, we covered it and let it sit and put the yeast rolls in the oven....15 minutes later everything was done!!! Brad sliced the pork and we all hovered over him with our plates! It was a delicious dinner with wonderful friends! Brad and Melinda, thanks for spending such a beautiful evening with us
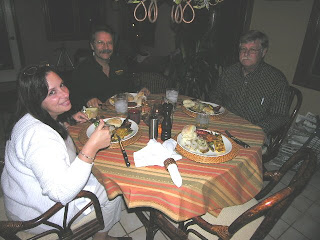
.....and Shugs thanks you for her pills....she's resting comfortably!!!