Sunday, January 31, 2010

I Dream of Snow Cream!!!

Even the slightest hint that we might be getting snow will remind me to check the pantry to make sure I have condensed milk....and that goes as far back as I can remember.  My mom always made snow cream when there was enough snow.  Sure, I remember the old saying that you should only use the second snow of the season, but I just can't figure that out.  Then again, it's rare for us to get a "first snow" that will offer enough to make the rich, delicious stuff, so I'm not going to put myself through the torture of having to wait for a second fall.

Of course, you want to get your snow from the deepest area possible....snow had drifted on our deck, so that was perfect!  Scrape off the top layer...then gather your snow. 


Generally, you'll need twice as much snow as the amount of snow cream you want to make, but that really depends if you have a light snow, or a wet snow.
The only ingredients are condensed milk (no, not evaporated milk...), sugar and vanilla...and, of course, the snow. 

There are some recipes on the internet that call for eggs, but I figure I'm taking enough risks eating the first fallen snow....better not take additional risks by eating raw eggs!

I start by mixing my ingredients, other than the snow.  For this batch I used a half can of the condensed milk, 1 teaspoon of vanilla and about a 1/4 cup of sugar...

Mix the ingredients, then start adding your snow, a little at time, tasting as you go along.  I think I used about 4 or 5 cups of snow...

.....and it yielded about 3 to 3 1/2 cups of snow cream....

.....and I ate it while I did this post.....yummmmmmmmm!!

There are alot of reasons why I love snow, but this one ranks right up at the top of the list.......

Friday, January 29, 2010

French Potato Salad - My Re-creation

If you follow my other blog here, then you will recall the French potato salad that Dennis had while we were in Paris:
It truly was one of my favorite things that I ate in Paris....so different from any potato salad I'd ever eaten (what, no mayonnaise?).

So, after blogging about it, I decided it was time to do some research.  As usual, I searched the internet for "French Potato Salad" and I search through my cookbooks......the one that sounded like it would taste most like what I tasted was the one from Julia Child's Mastering the Art of French Cooking, Pommes de Terre A L'Huile or sliced potatoes in oil and vinegar dressing.

Of course, I changed it up a little....that's just how I roll.  Instead of cooking the potatoes whole, as she calls for, I peeled them and cut them into slices. 


I did this because I felt that I would get mmore evenly cooked slices.  Then I put them in boiling salted water and cooked them at just below a boil until they were just barely fork tender.  Once they are done, put them in a bowl and add 1/4 cup of chicken broth and 1/4 cup of vermouth (white wine is fine!) and gently toss them to cover.  Let them sit while you make your dressing.

For my dressing, I used 2 tablepoons of red wine vinegar...then added 1 tablespoon of Maille Old Style Whole Grain Dijon Mustard.

...Julia's recipe calls for prepared mustard...yuck!  Besides, it's clear from the picture of what we had in Paris that it's a whole grain mustard...and I just like the Maille brand the best. 

Once I whisked those together, I added a little salt, then whisked in 4 tablespoons of olive oil (I used extra virgin, but I think the light olive oil or even vegetable oil might work a little better). 
 I then added chopped chives and peppercorns, drained my potatoes and prepared my plate!

It looks close enough and it tasted great....but we both agreed that it wasn't quite right!  After we ate our dinner, I put the rest of the potatoes in with the rest of the dressing and left them on the counter.  The longer they sat, the better they tasted!  So, if you try this recipe, make them in advance and allow them to marinate.....it was as close as I could get to what we had in Paris.  I'd also like to try adding more chives and pink peppercorns, instead of the red.

I'd love to hop a plane and go back and taste them again....but since I can't even remember where we ate, that's useless.  I'll just stick with this recipe!

Tuesday, January 26, 2010

Running with the Devil......

.....yes, I love Van Halen, but this post really has nothing to do with him....or that song.  This is actually the finale to the "belated" birthday dinners.  The request?  Deviled Crab!  I have to admit that the stuff I've seen in the little foil fake crab looking tins has never peaked my interest.  Sure, I've eaten them, but I just don't remember eating them.....and usually that's a reason that I don't normally cook something.
Soooo, when he asked for Deviled Crab, I asked why.  He didn't have an answer....it was just the first thing that came to his mind.  So, since I was the one who forgot his birthday, I went along with it.  I searched the internet and every cookbook I had for recipes.....it's just that they all seemed to be variations of regular crab cakes, but with bell pepper.

I have always loved bell peppers, but why eat the green ones, when you can have the beautifully ripe red ones....so that's what I decided to go with.  And since I already had some roasted red peppers in the fridge.....done!

I got all of my ingredients together....diced onions, celery, garlic and the most beautiful crab I've seen in a while.  It was unbelievably fresh for this time of year.

I started by sauteeing the onions and celery in a half olive oil and half butter, later adding the garlic so it wouldn't cook too much and become bitter.  Then I added the peppers.  I set them aside to cool.

Meanwhile, I combined mayonnaise and Dijon mustard, mixed well and poured that over the crab.  Then I took two slices of fresh bread and ground it in my mini processor, then added all but about 4 tablespoons of it to the bowl.

Next add the celery, onions and pepper (called a Holy Trinity....at least it is with green peppers) and mix well.  I put the mixture into my single serving baking dishes.
I then melted about a tablespoon of butter in the pan I'd cooked the trinity mixture in and added the breadcrumbs....then put them over the crab mixture.

I baked them at 350 degrees until the tob was golden brown and they were cooked through.  We grilled asparagus that had been tossed in olive oil, salt and pepper and grilled.

It was a delicious dinner and he enjoyed it.  So when I asked what he thought?  "It tastes kinda like crabcakes!"  I agree!  But it was good!

Bon Appetit!

Sunday, January 24, 2010

A l m o s t Parfaite (perfect)!!!!

If you happen to follow my other blog, you might remember this.....

...this was the first dish Melinda ordered in Paris....braised endive with ham and a bechamel sauce with gruyere cheese!  The only bad thing about it was that I didn't order it (AND I ended up with a cheese and ham omelet that was overcooked and had NO cheese!).


So, I've been dreaming of this dish since that day and I've been through every recipe in my cookbook gallery and on the internet.  In the end, I decided to use a version of Julia Child's recipe, especially since I'm currently reading the "Julie/Julia Project" blog.  Of course, "use" a recipe for me means that I'm going to use most of the ingredients and possibly the process. 


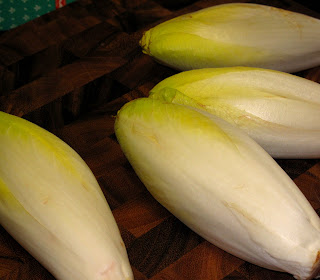
Julia's recipe calls for 12 (yes, a dozen!) endives....she must have been cooking for quite a crowd!  I bought 4....

....and sliced them in half lengthwise,


... melted butter in my pan and cooked them on medium high, just until they start to turn brown. 


Then I added a half cup of vermouth and a half cup of chicken stock


 and let that cook down until there was only a couple of tablespoons left in the pan.  Meanwhile, I made a "round" of waxed paper, which will be used to cover the endive as they bake.


Remove the pan from the stove, cover the endive with the waxed paper and the lid to the pan, then bake at 350 degrees for one hour (I know....long time, huh?).  Then you remove the pan, take off the lid (not the waxed paper) and cook for an additional half hour.  When they come out, they look like this:


I couldn't resist eating one, even though I still had the bechamel sauce to make....


....it was delicious!


Next I rolled each one in thinly sliced ham....since I only had a few slices of deli ham, I wrapped the others in prosciutto.  Then I started the bechamel sauce.  You make a buerre manie, which is made by mixing together equal parts of softened (not melted) butter and flour, then add to the pan....

....heat the pan and allow this mixture to cook just for a minute or two, then add milk (I'll tell you now that I used half and half because I only had skim milk - mistake - should have used half of each of those because my sauce was just toooo thick!)...a little grated nutmeg, then allow to thicken.  Then add grated gruyere cheese.


Pour over the ham and endive,


top with a little more cheese, then bake at 350 degrees until bubbly and brown on the top.


Although my sauce was a bit too thick, the flavor was there!  I was immediately transported back to my first morning in Paris!


I will make this again.....

Friday, January 22, 2010

Hurry!!!! Chicken Curry!!!

Yep, I'm still making "belated" birthday dinners.....but I am getting there!  The other day I realized I had some chicken breasts that had been in the freezer for a while and needed to cook them.  I don't keep many meats in the freezer other than chicken and hamburger, although I will freeze steaks if I happen to get a great buy on my favorite cut (tenderloin...ahhh!), but I'm very careful to wrap them in plastic wrap very tightly and them place them in freezer bags.

Soooo.....back to the chicken breasts!  I went through several of my cookbooks (I do have a few!) and was drawn to several chicken curry recipes.  After having heard Dr. Oz say we should eat curry 2-3 times a week, I decided to start that day!

The first thing I did was slice my chicken into slices....it's easier to do if the chicken hasn't completely thawed.

Next I seasoned the chicken.  I had seen a couple of recipes that called for seasoning with Garam Masala seasoning, which I had discovered a few months ago.  I made some from scratch, but I have seen it in the grocery stores.  Here's the recipe, if you want to make your own:

2 tablespoons cumin seeds
2 tablespoons coriander seeds
2 tablespoons cardamom seeds
2 tablespoons black peppercorns
1 (3-inch) stick cinnamon, broken up
1 teaspoon whole cloves
1 teaspoon grated nutmeg
1/2 teaspoon saffron (optional)

Put all but the nutmeg and saffron into a dry, heavy skillet over medium low heat.....stir occasionally as they toast....about 10 minutes.  Place them into spice mill, coffee grinder or food processor and grind to a powder, then add the nutmeg and saffron and stir.  It keeps for about 3 months covered in an airtight container.

I used about 2 tablespoons of the Garam Masala, and tossed it to cover the chicken and set aside for about 30 minutes.

Put about 2 tablespoons of olive oil into a hot skillet, then add the chicken and brown.

Set them aside and start to prep your vegetables.  I used 1/2 large onion, sliced, and some beautiful multi-colored tomatoes I had bought for a salad which I cut in half.  I also diced up 4 cloves of garlic and 3 medium sized red potatoes, diced.


OK....you noticed that there aren't any potatoes on that cutting board.  Truth?  It was a last minute thought....they were in a bowl on the counter and I couldn't resist cutting them up and throwing them in.....I wasn't sure they'd work too well, especially since I was putting all of this over rice.  Argh....alot of starch!  Soooo, I didn't take a picture....so I wouldn't have to tell you that it was a mistake.  Now?  It wasn't a mistake, but it wasn't fabulous either, although adding them did help to thicken the sauce.

So, back to the recipe.....I put the onion and diced/minced garlic into the pan with the drippings from cooking the chicken, just to soften. 

Then I added a cup or so of chicken stock and the potatoes, along with a teaspoon of curry powder.  (Hey look....I DO have a picture of the potatoes!)

While these were cooking (just too soften - be careful not to make mush out of the potatoes, which I do from time to time!) I made my saffron rice.  You're most welcome to "google" saffron rice, but I've been making Mahatma's Saffron Rice for years!  I'm not real sure my kids ever ate white rice, now that I think about it!

It's very inexpensive, easy to make....and so buttery delicious!


After the potatoes, onions and garlic have cooked, and the chicken broth has cooked down and thickened, add the chicken back to the mixture and toss...then add the tomatoes and toss lightly.

 Once the tomatoes are warmed, put the rice on a plate or in bowl, top with the chicken mixture and VOILA (I love the French language, even if I only know a few words!)


This might seem like it's a time consuming recipe, but it really isn't.  It's very quick to make and if you make plenty, you can have it again a day or two later....remember, Dr. Oz says you should have curry 2-3 times per week!  I guess I need another curry recipe.  I'll get back to you on that!

Sunday, January 17, 2010

Belated Birthday Dinner.....

You may not have heard.....I forgot his birthday.  I know.  Bad.  So, I've been trying to make it up to him, although he actually got a bit of a kick out of it.  I always try to cook something special for everyone's birthday, even if we decide to go out to the birthday boy's/girl's fave restaurant.....but Dennis has so many faves, it was hard to decide.  So, I started with Veal Parmigiana....he loves it!

I went to Harris Teeter to shop....they usually have the better products to cook with, especially when it comes to fresh ingredients.  And their cheese counter is pretty good for a grocery store!  But I was surprised that they didn't have freshly cut veal.  They had packaged pieces.....yep, I bought 'em.

They were actually nice pieces, although a little small.  I decided to pound them into paillards (yup...French word!), which are thin slices.  I use a zip top bag for this, mainly because it's a little thicker than clear wrap and doesn't seem to fall apart. 


Dennis came into the kitchen just as I was about to pound......

Once they were pounded into thin slices, I set up my dipping station.....2 eggs with a little water (beaten), flour (salt & pepper) and Panko bread crumbs and Parmesan cheese....you dip into the flour first, then the egg, then the bread crumbs.  Place them onto a parchment lined baking sheet and allow to the coating to "set up", which helps it to adhere to the meat and not fall apart in the pan when you're browning them.


While they were set aside, I started my sauce....and the camera battery died....and the other battery was dead....and I had to get the sauce done.  My sauce is very simple.....I put about 2 tablespoons of olive oil into a heated pan, add my diced/crushed garlic and let it soften.  Then I add a small can of tomato paste and turn the heat down low.....this allows the paste to carmelize/roast a bit and the flavors deepen.  Next I add tomato sauce and diced tomatoes....about a teaspoon of sugar, fresh basil and red wine (white wine works, too!)....then I just let it simmer on low for about 10 minutes (to let the alcohol evaporate), then cover and leave on low until ready to use.

So....I waited about 45 minutes for the battery to charge and then started the veal.  I put about 3 tablespoons of olive oil in the pan, then just browned them on medium high heat.  Remember, they have been pounded into thin slices....you want to brown them very fast, since they go into the oven next!


While they were browning, I grated my Parmesan cheese and set aside.....I have to leave the grater out in case Dennis reappears in the kitchen.  If he sees freshly grated Parmesan on the counter, you'll have to grate more....guaranteed.

After the veal was all browned, I put them onto parchment paper on a baking sheet....laid fresh mozzarella over the tops (Note:  I tried this new stuff in the grocery store....fresh mozzarella sheets. 

While it was better than the grated stuff in the zip top bags, it was expensive and a bit of a pain to deal with....I'm still in search of great mozzarella.  I'll let you know when I find it!).

Now here is where the recipe gets a little personal.  Alot of recipes call for you to pour the sauce over the veal, then cover with the mozzarella.  I don't do it that way.....I just coated and fried those suckers.  They have a nice crispy outside and covering them with sauce will ruin that!  So, I cover them with the cheese....bake in the oven at 400 degrees or more, just until the cheese has melted.  Remove from the oven....place the veal over pasta and cover with my rich, delicious sauce!  Then I sprinkle the Parmesan cheese over the top....add freshly baked bread and VOILA (French word for Italian food...I know)....Belated Birthday Dinner #2!!!