One of the most enjoyable, yet challenging, things about cooking has been learning how to flavor my food! I was raised by a country cook, so our pantry only had salt, pepper, a jar of poultry seasoning and a jar of spaghetti seasoning (and I can guarantee you she had no idea what was in either of those jars!). I didn't see a head of garlic until I was well into my twenties and I didn't buy fresh herbs until I was into my thirties. When I thought about that earlier, I knew I needed to share with you some of my tips for cooking was herbs and spices:
1. Ground spices release their flavor more quickly than whole spices. Ground spices, such as ground thyme, rosemary or cumin, can be used in recipes with shorter cooking times or can be added near the end of cooking for recipes with longer cooking times.
Whole spices need a longer time to release their flavor. They work well in longer-cooking recipes like soups and stews.
2. Robust herbs such as sage, thyme and bay leaves stand up well over long cooking times, while milder herbs like basil, marjoram and parsley should be added at the last minute for best results. This is especially true for fresh herbs.
3. Making a soup or stew that calls for fresh thyme? Just throw the whole stem in. Once the stew is complete, dish out the stems...the leaves will have fallen off into your delicious stew!


If you're adding rosemary to that stew, throw the whole stem in and pull it out at the end.....the leaves won't have fallen off, but it's such a flavorful herb, it will have left it's mark behind!
3. Spices and seeds such as fennel, cumin, sesame seeds and white peppercorns may be toasted to intensify their flavors. Add the spice to a dry, heated skillet and toast until aromatic, stirring occasionally.
4. Does the paper skin on a garlic head drive you nuts! When I buy a new head of garlic, I hold it under running water and gently peel away all of the skin. It makes it so much easier to pull off a clove when you need it! And if you're making a soup or stew where you're using the whole head, you don't have to worry about garlic paper floating around in your soup!

5. When you purchase fresh herbs at the grocer, wash and dry them immediately. Then wrap them in a dry paper towel, place in a zip top baggie and refrigerate. Some herbs keep longer than others. If you notice that they might be starting to deteriorate, pull them out of the fridge and hang them up to dry! My favorite herb is basil and it has a very short shelf life.....you can extend it by removing the leaves and layering them in kosher salt...they keep quite well that way!
6. Most herbs lose alot of their flavor once they're dried. If your recipe calls for fresh, and all you have is dried, try doubling the amount called for and then add more after tasting. Generally, you use 3 times as much dried as you do fresh.....but that can vary with the herb and with your taste palate.
It took me a while to learn which herbs to use with which dishes....here's a little help:
Basil: Only the leaves are used of the basil plant and it is available either fresh or dried. Basil adds a minty, clovelike flavor to sauces, salads and pesto. Basil is also a perfect compliment to tomatoes. It has a very short shelf life fresh, but it's easy to grow in the summer....it loves the heat, but it also loves lots of water! This is my most favorite herb of all!
Chives: Both the leaves and flowers of the chive plant are used. With an appearance of long grass, simply snip the mild onion-flavored leaves when needed. While you can use chives fresh or frozen, this is one herb that doesn't dry well, in my opinion. Uses include soups, salads, eggs,
vegetables, chicken, soft cheese spreads, butters, sauces and fish. It's easy to grow, although it prefers the cooler weather.
Cilantro: Also known as fresh coriander or Chinese parsley, cilantro is used to flavor dishes ranging from Asian to Indian to Mexican. Use sparingly, though, as too much cilantro will give your food a harsh, soapy flavor. It's a must in salsas and I love it in chili! Easy to grow, but another one that prefers the cooler weather.
Marjoram: Only the leaves of the marjoram plant are used and are available both fresh and dried. Very similar to oregano, marjoram carries a sweeter, milder flavor. Marjoram makes a great addition to almost any meat or vegetable dish. I have to say it's one herb that I rarely use and I've never grown it.
Parsley: Only the leaves of the parsley plant are used to add a mild, fresh taste to most dishes. Both flat-leaf parsley (also called Italian Parsley) and curly-leaf varieties are available and are virtually interchangeable in dishes that call for parsley. I almost always have parsley on hand...another herb that prefers the cooler weather. Mine is just now starting to take off!
Thyme: Both the leaves and flowers of the thyme plant are used and are available either fresh or dried. Thyme adds a flavor that’s a little bit minty and a little bit lemony. Uses of thyme include beef, fish, chowders, soups, vegetables and tomato sauces. I love to grow this herb and it does pretty well until it gets really cold.
Tarragon: Only the leaves are used of the tarragon plant which are available either fresh or dried. A favorite in French foods, tarragon’s aromatic, licorice-like flavor makes a great addition to chicken, fish, eggs, butter, vinegars, and soups. I've grown this herb just once and it was easy to grow, but I don't often use much of it.
Oregano: Only the leaves are used of the oregano plant available in both fresh and dried. Oregano, which is a classic addition to Italian food, also adds a robust and pungent flavor to stews, soups, fish, lamb, pork, vegetables and vinegars. This is also an easy herb to grow, but like thyme, it doesn't grow year round unless you bring it into the house.
Rosemary: The leaves of the rosemary plant are available in both fresh and dried varieties and the stems make easy skewers that add a ton of flavor to shish-ka-bobs. Rosemary is an excellent herb to be used with pork, beef, lamb, fish, poultry, stuffings, vegetables and marinades. Rosemary carries a very bold, piney and perfumy flavor so remember, a little goes a long way. This herb is a piece of cake to grow....just plant it in the flower bed and it will get huge!
Sage: Both the leaves and flowers of the sage plant are used in cooking in both fresh and dried varieties. A must in most homes at Thanksgiving for the holiday stuffing served, you can also add sage to eggs, poultry, pork, beef, lamb or pasta. Another easy one to grow and it does well until it gets really cold.

 ...and set out on the counter for 3 to 5 days.
  Stir it every day until you see bubbles forming at the top of the mixture. Then place it in the refrigerator for 3 days.
 ....then I cut it right where it starts to "bulb out"....
 ....I scoop out the insides (like making a jack o lantern!)....
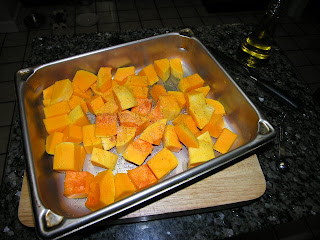
 .....then I cut them into cubes.....put them in a pan and drizzled olive oil over them, then added salt and pepper.....
 .....then I baked them in the oven at 400 degrees for about 40 minutes.
 (The turkey for the series is courtesy of Shelby.........her last paycheck from Harbor's Edge)


 I used my mini food processor, so I put the herbs in first and processed them until they couldn't process any more......then I poured them in the bowl and processed the bread (I used about 5 slices for this loin) and added it to the herb mixture.
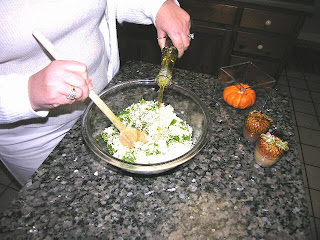
  Melinda then stirred that while pouring olive oil into the mixture to form the "stuffing-like" crust.
  Next we sliced open the loin
  and spread the herb crust mixture inside....
 closed that up.....salted and peppered the top of the loin,
  then added the remaining herb crust mixture. Tah Dah!!!!! That's it!!!
  I baked it at 375 degrees until my meat thermometer registered 165 degrees, which was about an hour.
 We forgot to take pictures of him cooking the veggies!!!!!!!!!!!
 we covered it and let it sit and put the yeast rolls in the oven....
 15 minutes later everything was done!!! Brad sliced the pork and we all hovered over him with our plates!
  It was a delicious dinner with wonderful friends!
 Brad and Melinda, thanks for spending such a beautiful evening with us
 .....and Shugs thanks you for her pills....she's resting comfortably!!!


 I squeeze out the cooked garlic and add it back to my broth. Once the chicken is cool, pick it from the bones and add it back to the broth with cut up celery, onions, carrots, and peas....bring to a boil, then add Mahatma Saffron Rice (an old family favorite around here!).
 I spoon it into bowls and top with freshly diced chives. It was delicious! The saffron rice just makes this soup.....it adds a pretty color, too!


